Overview
To get started with an account you, should have read and agreed to our terms of use, have a valid email address, a company and a pricing plan. The pricing plan you choose will determine which type of software module you create. There are 3 main subscription plans available that are billed either monthly or yearly. Learn more about our static pricing plans here.
After you decide on the sort of plan most favorable to your business, you can proceed to creating an account.
Setup Account
The process of creating an account on Stames is straightforward and only takes a few minutes. At the end of the registration process, you would have done 2 major things:
- Created a subscriber account and
- Built a software module.
The subscriber account allows you to manage all your billing & renewals, customize your software module(s), access vital information and make critical edits to your software and account.
Creating an account for the first time allows users to access 30 days free trial of the software. No credit cards needed. Just instant access.
To start the 30 days free trial, user must access our pricing plan page and choose a plan. Toggle between monthly and yearly plans and choose which plan and duration suits you best. Yearly plans are highly discounted and thus saves you more money after the trial period ends.
Step 1 - Email address
After choosing a plan, the user will be redirected to a page to confirm the email address. Provide a valid email address in the field and click on continue to proceed to the next step. Please note that the user will be required to verify the email.
Step 2 - Secure account
The next step will require the user to provide and confirm a password for the account. Choose and confirm a secured password (a combination of numbers, letters and symbols are usually recommended). Click on the continue button to proceed to the next step.
Step 3 - Personal Info
Provide personal and contact details including user first name, surname, telephone number, location etc. These information will help inform our team to whom the account belongs. Click on the continue button to proceed to the next step.
Step 4 - Company Info
This step requires the user to provide information about company including company name (legal company name), type of company (Partnership, Sole Proprietorship, Corporation etc), contact and location details.
Step 5 - Build Software module
This step will help us build a software module for the account. It starts by providing a generic name for your software module. The generic name must contain no spaces, must not more that 12 characters long and must be in small caps. You will also need to provide your business website url, support phone number, language and email address for general notifications. Once you are done filling the spaces provided, click on the continue button to proceed to the next step.
Step 6 - Create an admin account
This step requires the user to create a default admin user account for access to the software once account creation is successful. Provide a valid email address, phone number, name, password etc. Once done, click on the continue button to proceed to the next step.
Step 7 - Create Ticket Departments
This last step will require the user to create a minimum of 4 and a maximum of 8 ticket departments or categories. The ticket departments will help tell the software module where to send requests and which staff members can have access to those requests. You can always easily change, replace or even delete a department from the software module.
Once all data has been provided, click on complete registration to complete account and software module creation.
Email verification
After a successful account registration, an email with a verification link will be sent to the email address of the user provided in step 1 of the registration process. The user will be required to verify their email address before the subscriber account and the software module would be activated.
Once the user presses the button, the account will automatically be verified and the user redirected to the login page of the subscriber account.
However, in the case where the user does not see the verification email in the inbox or spam folder, he or she can resend the verification email by trying to log into his subscriber account with the email address and provided in the step 1 and 2 during the account registration process. A notice will pop up with a resend a verification link.
That link will redirect the user to the email verification page, where her or she can provide the email address.
Accessing account
Once the user has successfully created and verified an account, he or she will be redirected to the login page.
A successful login will redirect the user to the homepage.
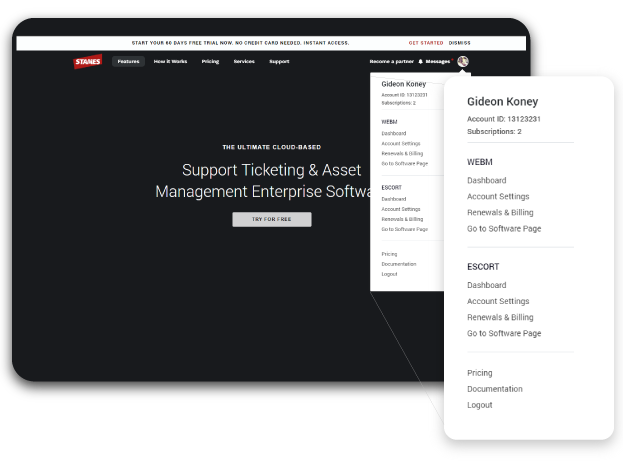
To access your subscriber account, locate and click on user profile photo on the menu bar to activate a drop down. The drop down contains information about your subscriptions and software modules including account id, number of subscriptions, module(s) information and much more.
Resetting password
To be able to reset password, user go to the login page of subscriber account. Once at the login page, click on "lost password?" link on the right hand side on top the password field. This will redirect user to the reset password page where user will be prompted to input email address.
A reset password email will be sent once the form is submitted with a link which will redirect to a page where users can set a new password. Once on the page, set a new password and then submit the form. If everything goes well, the user will be redirected to the login page with a notice confirming the successful reset.
Please note that reset passwords have a 30 mins expiration timer. Once the 30 minutes elapse, the reset link will expired. You would have to go through the process of sending another reset password link.
Account settings
The account settings for the subscriber account, allows the user to change to personal and company information, change password, customize software module, connect domain, send service request, connect email, change notification preferences and much more for each module under the account.
A. Personal info
Update your name, email address, company info, photo and much more. This allows our team to be able to get to know the account user better and be able to perform account verification if necessary. Your information is treated with the strictest of confidentiality.
B. Login & Security
The subscriber account gives super administrator privileges that allows the user to make important changes to any software module under the account. Therefore it is crucial to secure any subscriber account with passwords that is a combination of letters, symbols and numbers.
The login and security page allows users to change their passwords. Simply provide your current password, set and confirm your new password and then submit to secure your account successfully.
C. Company Info
Update company name, location, type, user position within the company and much more. Your information is treated with the strictest of confidentiality.
D. Module Settings
This page allows users to set or update the company logo, favicon, primary colors, contact URL, email address for general notifications, support telephone numbers, links and much more for your software module.
E. Notification Preferences
The notification preferences allow users to choose how the Stames send notifications to customers and staff when a ticket event occurs such as ticket submissions, ticket status changes, reply notifications etc.
F. Domain Connect
To connect your company domain to your software module, user must follow the below process:
- Register the domain name with a domain registrar such as Godaddy, Namecheap, Bluehost, Siteground etc.
- Log into your domain hosting console provided by the domain registrar, select the domain name and access the zone editor or DNS management console for that domain
-
Add the CNAME record below to the domain or subdomain you would like to connect to the software module.
CNAME RECORD: Mystameselb-64051257.us-east-2.elb.amazonaws.com
- Save the changes.
- At Domain Connect settings of Stames subcription account, click on the add domain button to launch a pop up dialog box which would prompt user to provide domain name.
- Enter the domain name without https://www., http://www. or forward slashes. Click on submit button for Stames to verify if the domain CNAME record points to our server and if so update the domain name in our database.
- You are all set.
Please note that you can revert the domain name back to the default by clicking on the Reset to default button.
G. Service Request
This page allows users to submit a service request to our support team. All service requests are paid services which includes installation of SSL certificates on domain, structural customization of software module, form creation & integration, email or domain connect etc.
To get started, follow the instructions on the service request form page. Fill the form and once its submitted, a guide will be assigned to the case to help user with the service request. Please note that one request can be submitted at a time for an account.
H. Form Settings
The form settings page contains information that helps the user to embed an iFrame form or integrate Stames into their website forms or other forms through the Stames API. With the Stames API documentation here, you can achieve sending any form or customer data to any Stames software module. This feature is limited ONLY to users on the Entry plan at the moment.
I. Mail Client Setting
This setting allows a user to configure their software module's mail client which will allow them to send automated notifications to customers, staff or admin using business email.
To get started, input your mail client information into the pop up dialog box initiated from the mail client settings page. The information can be retrieved from the users email hosting provider. Visit our
blog to learn more about mail clients.
Billing & renewals
The billing and renewal page allows users to renew, extend and access their subscription payments and invoices.
Once a software module subscription date expires, the module goes through a grace period where user accounts that are admin or staff lose login access. Customers can however still submit a request for at least 2 more weeks. If after the 2 weeks grace period, the user is still not able to renew the software, your module account will be closed and accessing your module platforms will produce a 404 page.
The great thing about Stames is that you never lose your module data. You can simply renew anytime to get your module up and running again.
Was this article helpful?

